Latest Publications

Remove an Autocomplete Entry from Chrome

This tip comes from this stackexchange post

Linux and Windows

Just highlight it in the dropdown list (using the arrow keys, or your mouse cursor) and press delete on your keyboard.

Note that you may have to press shift+delete in some cases, like if the autocomplete is in the address bar (URL) field.

Mac

Start typing so that the unwanted autocomplete URL comes up.

Hit fn+shift+backspace if you have a compact keyboard or shift+delete ⌦ if you have a keyboard with separate delete ⌦ key (and no fn). If you have a non-Apple keyboard, shift+delete should do the trick.

If it still doesn’t work:

  • Close the page and reload it; it should now be removed from autocomplete;
  • Check if the unwanted URL is in your bookmarks; once removed from bookmarks, it will disappear from autocomplete.

Mac OS X 10.x Bluetooth Restart

I recently upgraded to the latest OS X 10.10. I now seem to have issues with connecting my mouse and other bluetooth devices; my Mac simply doesn’t connect to the paired devices or doesn’t see them. Probably a bug. Restarting the bluetooth service seems to fix everything. You can do this one of at least two ways:

A) Restart your computer

OR

B) Force Quite the service (thanks to Isaac Keyet for the instructions):

  1. Open the Activity Monitor (Applications > Utilities > Activity Monitor)
  2. Find the process called blued and select it. (Tip: sorting using the Process Name column makes this much easier to find. Or just search for it)
  3. With blued selected, click the Quit Process button at the top.
  4. A dialogue comes up asking you to confirm the action. Press Force Quit. Since this process is run by the “root” user, you will most likely have to enter the Administrator password to continue.
  5. Done! The process quits, and immediately starts itself again. You should now be able to turn Bluetooth on/off again, as well as connect your devices.

How to show a shortcut menu in MS Word 2011 (for Mac)

One of the main things I miss from Microsoft Word for PC is the ability to show a context/shortcut menu from where ever my curser is in the document. This is especially useful for correcting misspelled words without using my mouse: I put my curser over the misspelled word, then hit the menu button on my Windows keyboard.

I searched a long time for an equivalent shortcut for Mac. I finally found it:

Shift + F10

context/shortcut menu

From the Microsoft Word 2011 website:

Display a shortcut menu.
This keyboard shortcut conflicts with a default Exposé key assignment in Mac OS X version 10.3 or later. To use this Office keyboard shortcut, you must first turn off the Exposé keyboard shortcut for this key. On the Apple menu, click System Preferences. Under Personal, click Exposé & Spaces. Under Keyboard and Mouse Shortcuts, on the pop-up menu for the shortcut that you want to turn off, click –.

My life is so much better now!

How to sign and return a document without printing it


Question: How can I legally sign and return a document without printing it?
Answer: Use EchoSign. (see below for quick instructions)

With the sophistication of digital security and authentication technologies available, why do we so often receive emails such as below asking for a document to be printed, signed, and hand delivered?:

emailrequest

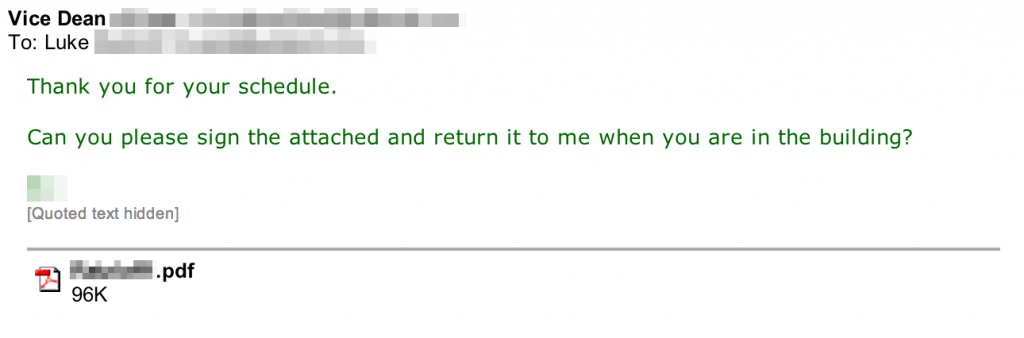
The above email asks me to:

  1. print the pdf file,
  2. sign the document,
  3. physically deliver the document to the requesting party

Alternatively I might:

  1. print the pdf file,
  2. sign the document,
  3. scan the signed document into a new pdf file,
  4. email the pdf file to the requesting party

Of course step #4 might replaced by courier, fax, mail, or some other antiquated form of document delivery (vacuum tube?).

But do I really need to print this document for my signature to be “valid”? The answer is no:

There is no legal reason (in most cases) that requires me to sign a physical document for my signature to be “valid”*.

The purpose of a signature is to signify knowledge, approval, or acceptance of a document (or content of a document). Because it is the signifying work of a signature that we are really concerned about, the law is flexible in what sort of mark is recognized as signifying “knowledge, approval, or acceptance” of a document.

In particular most jurisdictions have passed specific legislation recognizing electronic signatures as equivalent to non-electronic signatures (for example in the Alberta the Electronic Transactions Act, SA 2001, c E-5.5). The key is that the electronic signature be reliable for the purpose of identifying the person signing (ie the authentication of the electronic signature must be reliable) and that the signature be attached to the document in a reliable way.

The are a number of online services that allow users to upload documents and sign them (or send documents to others to sign) while sufficiently meeting these two requirements for the validity of electronic signatures. Two such services I have used are: Adobe’s EchoSign (https://echosign.com) and SignNow (https://signnow.com). SignNow is easiest to use, but I recommend EchoSign because it provides better signature authentication.

How does EchoSign authenticate electronic signatures? Basically EchoSign authenticates through email. After creating an account and verifying your email address you can upload and sign a document yourself then send the signed document to someone else (they do not require an account). You can also email someone a document for them to sign, without them having to create an account (in the act of receiving the email and signing the document they validate their own email address).

When someone signs a document, EchoSign includes a link to a document “Audit Report” which details the email addresses the document was sent to and signed by. The document once signed is sealed with an authentication certificate owned by EchoSign (Adobe) distributed by VeriSign so the document (including the link to the Audit Report) CANNOT be altered without invalidating the authentication certificate attached to the new PDF. This certificate is next to impossible to forge.

In summary, the extent that the signer has sole access to his/her email account is the extent that you can be sure no one else signed the document. If someone wanted to forge someone else’s signature, they would have to break into that person’s email account. This is possible, but so is forging physical signatures. Unlike physically signed documents however, once a PDF is signed with EchoSign, the document is impossible to alter.


Quick guide to signing a document with EchoSign and forwarding a signed copy to someone:

  1. create an account with EchoSign (if you have a google account, you can sign in with google). Go to: https://secure.echosign.com/public/login
  2. Once logged in, go to: https://secure.echosign.com/public/approve
    (also available as “Only I Sign” function under the “Home” tab)
  3. Enter the email address who you want to receive the signed document
  4. Enter a message to the recipient
  5. Upload the document you want to sign
  6. Check “Preview, position signatures or add form fields”
  7. Click “Sign”
  8. Identify the fields you want to sign
  9. Click “Send”

That’s it! You and the recipient will receive a copy of the signed document.

*Note: This is not legal advice. I am not a lawyer.

Transfering a File Securely

Update

Since this original post there have been a number of cloud storage services that take security very seriously. These services generally use correctly implemented advanced encryption. Some offer ways to share individual files or folders in relatively secure ways. One day I hope to have time to write detailed instructions for using these services. In the mean time here are several services (each with strengths and weaknesses) that are worth looking into:

  • SpiderOak – must use a local client that encrypts and syncs files to a secure server. You can share files by generating a link to specific files or folders to send to others (the link includes the encryption key required to decrypt the file).
  • Mega – uses javascript in your web browser to locally encrypt files and upload them to a server. You can share a link to these file to others (the link includes the encryption key required to decrypt the file).

The easiest way to send files securely is to encrypt the files with a program like 7-Zip, which password protects them. Then you are relatively safe to transfer however you normally transfer files.

An easy way to encrypt a file is with 7-Zip. Although this isn’t the most secure encryption method, it is good enough for most purposes.* Between encryption with 7-Zip and transferring the file over a secure channel (such as WeTransfer) your data is will be very safe.

Get 7-Zip

Option 1: Install 7-Zip (for Windows)

  1. Download either the exe or msi version of “7-Zip for 32-bit Windows” from: http://www.7-zip.org/download.html
  2. Launch 7-Zip from the star


Option 2: 7-Zip without installing (for Windows)

  1. Download form: http://portableapps.com/apps/utilities/7-zip_portable
  2. Launch the file and select a location on your computer to extract the program
  3. Navigate to this location and launch the program 7-ZipPortable.exe


Encrypt with 7-Zip

  1. Launch 7-Zip
  2. Drag and drop your file (or folder) into 7-Zip
  3. Select a location to save the new encrypted file
  4. Select a STRONG password (your files will not be encrypted unless you set a password)
  5. Select “Encrypt file names”
  6. Press OK
  7. Your files will now be contained in this single new file (*.7z)

Decrypt with 7-Zip

See the detailed instructions here

Transfer your File

However you choose to transfer, do not include the password with the file. Rather, either choose a password the other party can guess, perhaps with a hint, or communicate your password with the other party using another medium (eg via phone, txt, etc).

Email

For most purposes once your file(s) are encrypted it is safe to transfer them over email. Just make sure you are sending the *.7z file.

Transfer with WeTransfer

If you are not confident about yours or the other party’s email system, or the files you want to transfer are very large, you can transfer the encrypted file using a service such as WeTransfer. WeTransfer uploads your file to its server using a secure channel and stores the file on its server for 2 weeks, after which it is deleted. WeTransfer notifies your other party via email with a link to download the file. This link is not shared with anyone else.

  1. Go to https://wetransfer.com/ for information on how to transfer using their service

More information

See detailed instructions here including more ways to transfer files and how to decrypt files.


This post byluke is licensed under aCreative Commons Attribution 2.5 Canada License.

Get 7-Zip

Option 1: Install 7-Zip (for Windows)

  1. Download either the exe or msi version of “7-Zip for 32-bit Windows” from: http://www.7-zip.org/download.html
  2. Launch 7-Zip from the star

Option 2: 7-Zip without installing (for Windows)

  1. Download form: http://portableapps.com/apps/utilities/7-zip_portable
  2. Launch the file and select a location on your computer to extract the program
  3. Navigate to this location and launch the program 7-ZipPortable.exe

Encrypt with 7-Zip

  1. Launch 7-Zip
  2. Drag and drop your file (or folder) into 7-Zip
  1. Select a location to save the new encrypted file
  2. Select a STRONG password (your files will not be encrypted unless you set a password)
  3. Select “Encrypt file names”
  4. Press OK
  5. Your files will now be contained in this single new file (*.7z)

Transfering Large Files

Question: I have a large file to send to a friend, but the file is too large to send through email.
Question: I have many picture files to send to a friend, there are too many of them to send through email.

There are a number of services that make it easy to transfer large files over the internet. The following are some of the ones I use.

Option 1) Wetransfer.com

Limit: 2GB per transfer

This has been my goto service: no signup required, no annoying ads, and relatively secure. Your files are accessible to only those who have the link and they are automatically deleted after two weeks.

  1. go to the site: https://wetransfer.com/
  2. upload your file(s)
  3. enter the email address of whoever you want to share the file(s) with

Option 2) Mega

Limit: 50GB (with free account)

No signup required, no annoying ads, and your files are encrypted on their server so it is impossible for anyone without the link can access them. Mega has advanced sharing features, but to upload a single file (eg a zip/compressed file of whatever you want to share) follow these steps:

  1. go to the website: https://mega.co.nz
  2. upload the file(s)
  3. click on the link icon beside your file to get the share link
  4. email the link to whoever you want to access the file(s)

See Mega’s website

Option 3) Dropbox

Limit: 2GB (with free account)

This is more of an online file backup and collaboration solution, although a powerful one on which I rely heavily on a daily basis. Dropbox creates a folder on your computer, makes an online backup of the contents and syncs it whenever any file is changed.  One feature of this service is that you can share/collaborate folders and files with other Dropbox users or share files with anyone using a public link.

How to share with public (detailed instructions here):

  1. install Dropbox on your computer
  2. copy your file into the Dropbox folder on your computer
  3. Right-click on the file and select “Copy Public Link” from the Dropbox menu

Option 4) Google Docs

See my Instructions

Google Docs: https://docs.google.com

Option 5) Microsoft Skydrive

See my Instructions

Microsoft SkyDrive: https://skydrive.live.com

Option 6) Box

See their website for details


Note: It may be helpful to gather and compress all your files into one package. To learn how to do this follow Mac instructions or Windows instructions.


This post byluke is licensed under aCreative Commons Attribution 2.5 Canada License.

Someone has been sending spam from your email account

Your friends have been receiving spam email apparently from your Yahoo/Gmail/Hotmail/etc address?

What does this mean?
At least one of three things may be going on:

  1. Your email account may be compromised. In other words a spammer has gotten a hold of your account password and is using your account to send spam to your contacts,
  2. A virus/malware has infected one of the computers you use login to check your email and is accessing your account, or
  3. A spammer is using an email list that has both our addresses in it and just happened to faking an email from you

What to do?
Although #3 is the most likely (and is actually quite common) you should:

  • change your email account password ASAP just to be safe
  • make sure your computer has the latest updates (whether Mac, Linux, or Windows). Eg run the Windows update to make sure everything is up to date
  • if you have a virus scanner, make sure it is up to date
  • scan your computer for viruses/malware
  • speak with whoever is in charge of the computers at your work or other place you check your email from about a possible infection

Removing a Facebook Spam App

A Facebook Spam App is one that tricks you into installing then proceeds to post unsolicited messages onto your wall, your friends’ walls or sends messages.

Note: no Facebook app can tell you anything about who visits or how many people visit your profile. Any app that makes these claims is fraudulent.

How to remove an app

1) log into Facebook

2) click your Account menu in the top right corner of your page

3) select Privacy Settings

2011-03-15_153913_edit

4) on the bottom of the Privacy Settings page select Edit your settings

2011-03-15_154944

5) in the Apps to use area click the Edit Settings button

2011-03-15_155350

6) look for any suspicious app that you have installed recently (or any other app you don’t trust) and click the X to remove it

2011-03-15_155438

Receive Gifts from Visitors (money and more)

Bloggers blog for many different reasons–rarely though is it for direct financial gain. So what should you do when visitors inquire about contributing financially to your blog? Even if you find yourself disinterest in receiving financial contributions from visitors, accepting such offers can be a way for your visiters to feel acknowledged and connected to your site.

The biggest hurdle for bloggers is how to facilitate this outpouring of gratefulness, especially when such outpouring takes the form of small donations, while maintaining a certain level of anonymity. There are several different ways to receive small donations from your blog visitors:

PayPal

PayPal is the most flexible and universal way for visitors to send money/donations. The transaction is free if visitors send a personal payment. To send a personal payment one must:PersonalPayment

1) log into their paypal account
2) select the send money tab
3) select the personal payment tab

(there is a credit card fee if the visitor uses a credit card:  the visitor decides whether he/she pays this fee or whether it comes out of the donation he/she is sending).

Alternatively you can make a donate button ( ) on your website. Users will be directed to login or create a paypal account. Transaction costs for payments through a donate button are 2.9% + $0.30 per transaction.

My recommendation generally is to write a short blurb about personal payments: If you would like to support my work through a donation, please feel free to send me a money gift from your paypal account to myemail@address.com.

Other payment options:

flattr – neat micro payment scheme that is starting to take off (flattr keeps 10% of what you make)

pledgie – make a fundraising goal and allow visitors to pledge (uses paypal 2.9% + $0.30 per donation)

gift cards – visitors can buy new or load top up e-gift cards (eg starbucks, amazon, chapters)

online wish list – nice visitors might buy you books (eg amazonchapters)

Other ways to monetize blog traffic:

ads – post ads on your site; ad companies pays per click (eg adsense)

affiliates – companies pay commission for sales/customers sent to them from you (eg netflixcafepressamazon, etc)

sell custom merchandise  (eg cafepresszazzle, etc)

Sync Droid with Outlook through USB

B2C_droid_size-US-ENUnfortunately Droid phones (and many other phones running Android) cannot sync with Outlook through USB. It is possible to sync your phone with Outlook by first going through gmail however, this is not always desirable.

Luckily there is third part software!

http://www.companionlink.com/androidusb/
http://www.markspace.com/products/android/missing-sync-android.html
http://www.wavestore.co.uk/index.php/products/mylink-access.html